Realistic driving
When you're new to the simulator, having as many indications and automated mechanisms as possible allows you to get to grips with its basic principle.
Ideally, however, you should be able to make lines with as few indications and automated mechanisms as possible. Here's how to understand signage "globally", so as to dispense with the need for interface information.
Note that if you're not using the Zuiki controller, I advise you to leave the lever position visible.
Speed Limits
This section does not concern trains/sections using D-ATC/ATACS systems, as the limit is indicated directly on the dial.
For maximum speed on the track, please consult the line guide.
Track signals

On the track, speed limits are represented by white signs with black writing. They are sometimes accompanied by a smaller number. Speed limits last for the duration of a curve or switch.
The first sign indicates the new limit, and the second (if present) indicates the distance subject to the limit (here, 75km/h limit on a 370m curve). The limit is considered crossed once the entire train has passed (not just the front of the train).
There may be a second limit sign below the first. This is reserved for express trains with seating capacity.

There may also be a small orange (or yellow with red stripes) or green (🟧/🟩) square below the main panel. The orange square indicates that the limit can be increased by +5km/h in the case of "new high-performance trains" (i.e. all the trains proposed in the simulator). The green square refers to 209 or E233 series trains. It also increases the limit by +5km/h, except in sections where the maximum speed is 120km/h or more. In this case, the limit is increased by +10km/h.
 When you're on a turnout, you'll see limit signs with black corners, so that it looks as if they're pointing to the right or left.
This means that if you need to take (or arrive at) a turnout in the direction indicated, you must drive at the speed indicated.
 This sign signifies the end of the limit. Please note that the end is only effective once the train has completely passed the sign.

On the Oito line, there are also limits represented by black signs with white writing. These concern tilting trains (E353 series used as Limited Express trains on this line).


These signs are used to indicate a temporary speed restriction (e.g. during railworks). The first sign warns of the speed limit (45km/h in this case) and is placed 500/600m before the second sign, which indicates the start of the limit.
The third sign indicates the end of the restriction, and is only effective once the train has completely passed the sign.
Light signals
Main signals
A track is divided into several sections called "blocks". There are several types of light signals:
- Exit signals, placed at the end of stations, often on single-track lines, and generally made up of 2 lights: red and green. They indicate whether the train is ready to move onto the track.
- Block signals are placed at the beginning of a block to indicate to the driver what to do inside the block.
Entrance signals are placed before the train enters the station, to regulate entry.
Just before a turnout, there may be several signals, in which case they are placed to match the profile of the turnout, with one signal higher than the others. This represents the track that does not use the switch. For example, a red signal at the top left and a green signal lower down on the right means that the train will use the switch to go to the right (and slow down accordingly).
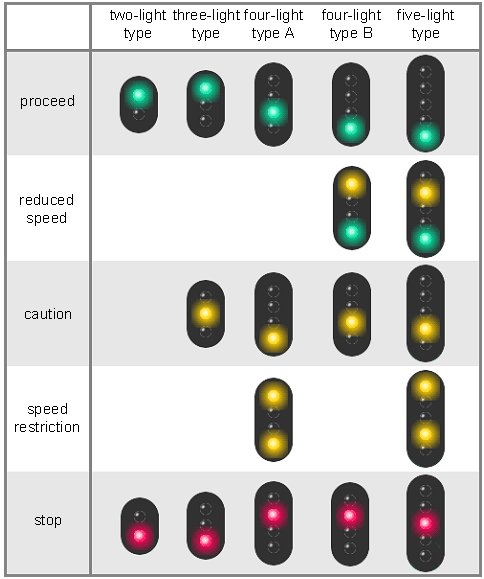
There are several signal formats, with more or fewer lights. Likewise, there are several indications. Here's a summary table.
-
Proceed (green): No worries on the lane, you can drive at the maximum authorized speed (except limitation)
-
Reduced speed (yellow/green): Displayed when the next signal is "caution" or "speed restriction". Speed is reduced to 75km/h or 65 km/h depending on the line.
-
Attention (yellow) : Displayed when the next signal is "speed restriction" or "stop". Speed is reduced to 55km/h or 45 km/h depending on the line.
-
Speed restriction (yellow/yellow): Displayed when the next signal is a stop sign. Speed is reduced to 25 km/h.
-
Stop (red): The train must stop before entering the block.
When several speed limits are present (e.g. via a sign and via a light display), the speed to be applied is the lowest of the limits.
Repeat signal
There are also repeat signals. They are linked to the next block/entrance signal and repeat their signal. They are used when visibility makes it impossible to see the signal in advance. They display 3 lights in a row and have the following meaning:

- 3 vertical lights: the next signal is "proceed".
- 3 horizontal lights: the next signal is a "stop".
- 3 diagonal lights: other cases.
Distance signal

A distance signal is linked to an input signal. They are used on lines that are not on an automatic lighted block system or where visibility is reduced, and are often used on single-track lines. They are rectangular in shape. The signal displayed lets you know what signal will be displayed on the incoming signal. Here's the correspondence:
| Signal de distance |
Signal d'entré |
| "Libre" |
"Libre" |
| "Vitesse réduite" |
"Attention"/"Vitesse restreinte" |
| "Vitesse restreinte" |
"Arrêt" |
Temps et prochaine gare
Pour avoir l'heure actuelle, la solution la plus simple est... de regarder la montre à gousset du conducteur (exception faite sur la ligne Oito, où celle-ci n'est pas visible en entier).
Sinon, la plupart des trains sont équipé d'un écran affichant diverses informations. Comme cet écran est souvent lié au type de train utilisé, le détail de ces informations est indiqué dans la page de la ligne associée.
Notez toutefois que pour les trains de la série 205 (Ligne Senseki) et de la série E129 (Ligne Shin-etsu line), l'information d'heure d'arrivée en gare n'est pas disponible. L'affichage du temps restant (STA) est donc conseillé.
Enfin, pour les lignes où les trains traverses des gares sans s'arrêter (trains de type Rapid, Express, ...), un son est émis, disant "tsûka", avant d'arriver dans une gare où l'on ne doit pas s'arrêter.
Inclinaison du terrain

L'inclinaison de la voie est signalée par des panneaux de ce type, sur le côté du rail. La partie noire indique l'inclinaison sur laquelle nous somme, la partie blanche indique la nouvelle inclinaison.
La valeur de l'inclinaison est écrite sur la partie blanche en ‰ (pour mille), ou L pour dire terrain plat. Toutefois, celle-ci peut être peu visible dans le simulateur. Donc, si la valeur vous intéresse, je vous conseille de laisser actif l'affichage de l'indicateur d'inclinaison.
3 positions sont possibles :
- / : Terrain en montée
- - : Terrain plat
- \ : Terrain en descente
Position d'arrêt en gare

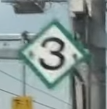
Lorsque la distance restante et le guide d'arrêt ne sont pas visibles, vous devez utiliser les panneaux indiquant où arrêter votre train. Ces panneaux sont de forme carrée, tourné de 45°, avec un contour coloré (souvent rouge/orange) et souvent un numéro a l'intérieur. S'il n'y à pas de numéro, c'est un arrêt obligatoire au panneau.

Ce numéro indique la position d’arrêt pour un train ayant autant de voitures (ou moins) que le nombre affiché. Il faut donc connaître le nombre de voiture que comporte votre train (indiqué sur l'écran de paramétrage de la simulation).

L'objectif est de s'arrêter avec l'avant du train au niveau du panneau. A noter que les vidéo ont été prises avec la caméra à l'avant du train. Donc, si vous jouez avec la vue cockpit, il vaut prendre en compte que la perspective n'est pas tout à fait correcte. Il vous faudra donc laisser passer le panneau par rapport à l'avant du train.
Correction de la position d'arrêt
Lorsque la correction est en manuel, si vous dépassez la position d'arrêt dans une gare, il vous faudra manuellement reculer le train afin de bien vous positionner sur le quai.
Pour reculer, il faut vous mettre en position neutre (N), puis appuyer 2 fois sur [↓] afin de passer de la marche avant (F) à la marche arrière (R). Actionnez ensuite le levier sur un niveau de puissance (P1-P5) pour reculer.
Une fois bien placé, n'oubliez pas de repasser en marche avant. (Position neutre, puis 2 fois [↑]).
Faire un bon arrêt
Lorsque l'on doit s'arrêter en gare, un bon conducteur applique un certaine force de freinage au départ, puis, en quelques étapes (3 ou 4), il réduit sa force de freinage jusqu'à l'arrêt (par exemple: N > B7 > B6 > B4 > B2 > B1 ou N > B7 > B5 > B3 > B1).
Et bien sûr, un bon conducteur ne rappliquera pas un niveau supérieur pendant son freinage.
Dead man's switch
The dead man's switch function checks that the driver is still able to operate the train. The principle is simple: if, after one minute, no commands have been entered (buttons, lever changes), an alarm sounds.
The driver then has 5 seconds to press the dead man's switch to indicate that he is still able to operate the train. If he fails to do so, the train will automatically stop, activating the emergency brakes.
Dead section
On some lines (e.g. Jôban Line), certain sections are not supplied with power (e.g. following a change from DC <-> AC supply). In these areas, no power should be applied. They are represented by the following signs:


-
The first (2 black stripes on a yellow background): indicates the arrival of a dead section.
-
The second (3 red stripes on a white background): start of dead section (AC and/or DC)
-
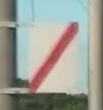
Third (1 red stripe on white background): start of dead section (AC)
-
Fourth (white circle with black border): end of dead section
Note that the simulator does not take these dead sections into account, and that it is still possible to accelerate in them.
Other signals
 This sign indicates that you must use the horn, either because there is an unprotected level crossing, or to warn people when approaching a bridge or tunnel, or when there are workmen working on a site near the tracks. Note that when you pass workmen on the tracks, you should also use the horn to signal that you've seen they're there.
 This sign indicates that a station is approaching, but is not always present. It is often placed when visibility is too poor to know where the station is.

